Showing posts with label NRB. Show all posts

Adding Removing devices from the domain

IBM
You can remove both discovered devices and manually added devices from the current domain so that they no longer appear in the topology map. This action does not delete the affected devices from the NCIM topology database.
You use the Remove Device Wizard to manually remove devices from the current domain. This removes the association of the device or devices with the current domain and prevents the device from being visualized in topology maps in the Network Hop View or Network Views for the current domain. However, the underlying device data is not removed from the NCIM topology database.
Note: You can also delete a manually added device from the NCIM topology database using the Topology Management > Delete Device option. This option is not available for discovered devices.
To launch the wizard, complete these steps.
  1. Click Network Availability > Network Hop View to go to the Network Hop View, and display a topology map. The topology map displayed must contain at least one of the devices which you want to remove.
  2. In the Network Hop View, select one or more devices to remove from the domain. Then right-click to display the context menu and click Topology Management > Remove Device from Domain from the context menu. The Remove DeviceWizard Device Selection window opens.
  3. Complete the Device Selection window as follows.
    Please select the devices you would like to remove from the domain domain_name
    Lists all device selected in the topology map. You can change the selection here by deselecting devices as required.
    Reason
    Reason for removing these devices from the domain.
  4. Click Next. The Confirm Details window is displayed.
  5. Review the information on the Confirm Details window and click Finish The Success window is displayed indicating that the specified devices have been removed from the domain.

Sharing resources in the network.

In computing, a shared resource or network share is a device or piece of information on a computer that can be remotely accessed from another computer, typically via a local area network or an enterprise Intranet, transparently as if it were a resource in the local machine.

Examples are shared file access (also known as disk sharing and folder sharing), shared printer access (printer sharing), shared scanner access, etc. The shared resource is called a shared disk (also known as mounted disk), shared drive volume, shared folder, shared file, shared document, shared printer or shared scanner.

The term file sharing traditionally means shared file access, especially in the context of operating systems and LAN and Intranet services, for example in Microsoft Windows documentation.[4] Though, as BitTorrent and similar applications became available in the early 2000s, the term file sharing increasingly has become associated with peer-to-peer file sharing over the Internet.

Common file systems and protocols

Shared file and printer access require an operating system on the client that supports access to resources on a server, an operating system on the server that supports access to its resources from a client, and an application layer (in the four or five layer TCP/IP reference model) file sharing protocol and transport layer protocol to provide that shared access. Modern operating systems for personal computers include distributed file systems that support file sharing, while hand-held computing devices sometimes require additional software for shared file access.
The most common such file systems and protocols are:
Primary operating system Application protocol Transport protocol
Mac OS Apple Filing Protocol
  • TCP,
  • UDP or
  • AppleTalk
Unix-like systems Network File System (NFS), SMB
  • TCP or
  • UDP
MS-DOS, Windows SMB, also known as CIFS
  • TCP,
  • NBT (includes UDP),
  • NBF, or
  • other NetBIOS transports
Novell NetWare (server)
MS-DOS, Windows (client)
  • NCP and
  • SAP
  • SPX (over IPX), or
  • TCP
A resource pool makes it easier for you to administer people or equipment assigned to tasks in more than one project file. The resource pool centralizes resource information, such as the resource name, calendar used, resource units, and cost rate tables.
The "primary operating system" is the operating system on which the file sharing protocol in question is most commonly used.
On Microsoft Windows, a network share is provided by the Windows network component "File and Printer Sharing for Microsoft Networks", using Microsoft's SMB (Server Message Block) protocol. Other operating systems might also implement that protocol; for example, Samba is an SMB server running on Unix-like operating systems and some other non-MS-DOS/non-Windows operating systems such as OpenVMS. Samba can be used to create network shares which can be accessed, using SMB, from computers running Microsoft Windows. An alternative approach is a shared disk file system, where each computer has access to the "native" filesystem on a shared disk drive.

Adding and removing devices in the network

Adding and Removing Devices

Adding new devices to a virtual machine is easier than connecting new devices to a real computer. Removing or disconnecting devices is also easy. The following virtual devices can be added to the configuration or removed from it:
  • virtual hard disk drive
  • CD/DVD drive
  • floppy disk drive
  • network adapter
  • serial port
  • printer port
  • sound device
  • USB controller
Any of the aforementioned devices can be added to the corresponding virtual machine only when it is stopped.
Note: To be able to connect any virtual device to a real one, you should have system privileges to access the real device. Otherwise, the real device will not appear in the list of available devices even though it is installed on your computer.
Adding a New Device to a Virtual Machine
  1. Choose Configure from the Virtual Machine menu to open Virtual Machine Configuration.
  2. Click the Hardware button at the top of the Virtual Machine Configuration dialog to open the pane for editing hardware devices.
  3. Click the Add button PlusButton in the bottom part of the Virtual Machine Configuration dialog and select the device to be added to your virtual machine.
    Note: The Add button is disabled when the virtual machine is running. You need to stop the virtual machine before you can use this button.
    PD6_Add Hardware Menu
  4. If you selected any device except for a hard disk, the corresponding device with a typical configuration is added at once and ready for use.
    If you selected a hard disk, you should specify some parameters:
    • The hard disk type: a new image file or an existing one. Select Boot Camp if you want to add an existing Boot Camp partition as a hard disk to your virtual machine.
    • The hard disk location. Provide the path on your Mac to the existing image file or the path and name for the new image file. By default, Parallels Desktop offers to save the new image file in the virtual machine PVM bundle.
    • The hard disk size for the new hard disk image file.
    • For the new hard disk image file, you can choose one of the following formats: Expanding or Plain. By default, the hard disk will have the Expanding format. To create a Plain hard disk, clear the Expanding disk option. If you want the virtual hard disk to be split, select the Split the disk image to 2 GB files option. For more information on hard disk formats, refer to Support for Virtual and Real Disks.
    PD6_Adding Hard Disk
    Click OK, to add the hard disk. After you added a new virtual hard disk to the virtual machine configuration, it will be invisible to the operating system installed inside the virtual machine until the moment you initialize it. For detailed information on how to initialize the newly added hard disk, see Initializing the Newly Added Disk.
After the new device is added, you can manage its properties as usual and start using it.

Removing Devices From the Virtual Machine Configuration

  1. Choose Configure from the Virtual Machine menu to open Virtual Machine Configuration.
  2. Click the Hardware button at the top of the Virtual Machine Configuration dialog to open the pane for editing hardware devices.
  3. Select the device you want to remove and click the Remove button MinusButton in the bottom part of the Virtual Machine Configuration dialog.
Note: If you accidentally click the Remove button MinusButton, click Cancel in Virtual Machine Configuration. Once you click OK, the device will be removed.

PSD to CSS Conversion

Many web designers start a new project by designing a mockup in Photoshop before actually coding the website. For a designer who is comfortable with Photoshop and with this process, less time can be used to create the end result.
For those designers who have not mastered the process of converting a design into a fully coded website, these 10 tutorials are excellent learning resources. (For tutorials on creating layouts in Photoshop, see 35 Tutorials for Creating Website Layouts in Photoshop).

From PSD to HTML, Building a Set of Web Designs Step by Step

PSD to HTML Tutorial
Collis Ta’eed published a post about five months ago at NETTUTS that takes a very detailed look at the process of coding a site with a PSD file as a starting point. This is a site that Collis designed in Photoshop and the post goes through every step of getting it to the point of being a working site, with all the CSS and HTML coding provided.

Build a Sleek Portfolio Site from Scratch

PSD to HTML Tutorial
A few months prior to the previous post, Collis also published this exceptional tutorial. This post was the 2nd part of a series that included a tutorial on PSDTUTS for creating the design in Photoshop. The two posts form one of the most useful sets of tutorials for any aspiring web designer, or other designers who could use some pointers for the process of starting with a design in Photoshop.

Encoding a Photoshop Mockup into XHTML and CSS

PSD to HTML Tutorial
Chris Spooner also did a similar two-part series of posts for creating a design in Photoshop and then coding the site with XHTML and CSS. While Collis showed us how to code a portfolio site, Chris focuses his tutorial on blog design.

How to Convert a Photoshop Mockup to XHTML/CSS

PSD to HTML Tutorial
This tutorial is written by Chris Spooner which goes into some detail about the conversion process. It focuses a lot on XHTML which is slightly different than HTML5. But it’s still a fantastic guide to get started and learn some pointers along the way.

Design and Code a Slick Website from Scratch

PSD to HTML Tutorial
This is a multi-part tutorial which was published on NetTuts+ a few years back. The code examples are fantastic and it’s one of the better solutions to help out web developers. Also the writing is fairly in-depth which means you have the chance to learn intricacies about coding website layouts in general.

How to Convert a PSD to XHTML (screencast)

PSD to HTML Tutorial
Following the positive response to Collis’ tutorials listed above, NETTUTS put together 3 screencasts to help make the process a bit easier to follow. For many people, the video tutorial can be more helpful. If this is the case for you, this post can be extremely valuable.

Converting a Photoshop Mockup (screencast)

PSD to HTML Tutorial
Chris Coyier of CSS-Tricks put together a three-part series for converting a mockup into a working site. The link goes to the CSS-Tricks video page, scroll down until you see video numbers 12, 13, and 14.

Code a Vibrant Professional Web Design with HTML5/CSS3

PSD to HTML Tutorial
Unlike many other tutorials, this one published on Design Instruct focuses specifically on HTML5. The standards have only been around a few years but they continue to evolve as web browsers are growing in support. Note this tutorial is a follow-up from an earlier article which explains how to create the PSD in Photoshop.

Creating a CSS Layout from Scratch

PSD to HTML Tutorial
This tutorial from Subcide starts with a basic design and takes us through the steps of coding the site. Along the way there are plenty of code samples and screenshots as the example site progresses.

CSS layout DEsign


How to build a basic CSS layout?
Designing without tables by using CSS layouts is fast becoming the new standard on the Web because of the many benefits it offers. Web browsers used these days are now able to render web pages proficiently. In this article I will endeavor to create a basic 2 column CSS layout which you can use for future design projects.

1. Divide your page into sections - the tags allows you to create distinct divisions on your web page.
They are identified with a unique id. You can then add a style (css selector) that specifically applies to the div of that id. Remember to include the DOCTYPE (to render your page accurately in the browsers) and meta tags (enables search engines to spider your pages).
wrapper: is the div that wraps around all the other divs like a container for the page elements.
header: defines the top banner of the page
main: defines the main content of the page
nav: defines the navigation of the page
footer: defines the footer and sub-navigation of the page
<!DOCTYPE html PUBLIC "-//W3C//DTD XHTML 1.0 Transitional//EN" "http://www.w3.org/TR/xhtml1/DTD/xhtml1-transitional.dtd">
< html xmlns="http://www.w3.org/1999/xhtml">
< html>
< head>
< title>How to Build a Basic CSS Layout</title>
< meta name="Description" content="How to Build a Basic CSS Layout" />
< meta name="Keywords" content="css layout" />
< meta http-equiv="Content-Type" content="text/html; charset=iso-8859-1">
< /head>
< body>
< div id="wrapper">
< div id="header"></div>
< h1>Basic CSS Layout</h1>
< div id="nav"></div>
< h2>Navigation</h2>
< div id="main"></div>
< div id="footer"></div>
< /div>
< /body>
< /html>

2. Create the CSS code - below is the CSS code that styles the page as a centered 2 column CSS layout with a navigation bar and a footer. The div#wrapper style creates the centered box which acts as a container for the rest of the page content. The width: 80% rule sets the width of the div. The background-color:#FFFFFF rule creates a white background for the div. The margin-top: 50px and margin-bottom: 50px rules create a space of 50 pixels for the top and bottom margins for the div itself.
The proper way to center a block-level element with CSS is to set margin-left: auto and margin-right: auto. This instructs the browser to automatically calculate equal margins for both sides, thus centering the div. The border: thin solid #000000 rule adds a border around the outer div. The rest of the CSS code styles the divs for the header, footer, nav, and main content.
The div#header and div#footer styles set margins and padding for those divs. In addition, div#header includes the text-align: center rule to center the header text, and div#footer includes the border-top: thin solid #000000 rule to create a border along the top edge of the div to replace the horizontal rule above the footer in the table-based layout.
The div#nav and div#main styles create the two columns in the middle of the centered box. In the div#nav style, the float: left rule pushes the div to the left side of its parent element (the wrapper div), and the width: 25% rule sets the div's width to 25 percent of the parent element. With the nav div floated to the left and limited to a set width, it leaves room for the main div to move up to the right of the nav div, thus creating the two-column effect. The div#main style includes the margin-left: 30% rule to keep the main text aligned in a neat column instead of spreading out below the nav column. The main div's left margin is set to a value slightly larger than the width of the nav div.
<style type="text/css">
< !--
body {
background-color: #999999;
font-size:12px;
font-family:Verdana, Arial, Helvetica, sans-serif;
}
div#wrapper {
width: 80%;
background-color:#FFFFFF;
margin-top: 50px;
margin-bottom: 50px;
margin-left: auto;
margin-right: auto;
padding: 0px;
border: thin solid #000000;
}
div#header {
padding: 15px;
margin: 0px;
text-align: center;
}
div#nav {
width: 25%;
padding: 10px;
margin-top: 1px;
float: left;
}
div#main {
margin-left: 30%;
margin-top: 1px;
padding: 10px;
}
div#footer {
padding: 15px;
margin: 0px;
border-top: thin solid #000000;
}
-->
< /style>
3. Create the side navigation menu - to build the left side navigation I use the normal CSS code for the different links ie
a:link {
text-decoration: none;
}
a:visited {
text-decoration: none;
}
a:hover {
text-decoration: underline;
color: #FF0000;
}
a:active {
text-decoration: none;
}
If links are placed elsewhere on the page they will inherit the same properties as above..a blue link that hovers to red.
What if you wish to create another set of different colored links that change color and are underlined when your mouse passes over them?
4. Create the bottom navigation - to include the navigation in the <div id="footer"> section of the page, I use div#footer and code each link accordingly. To make the list go horizontally I use: display: inline;
div#footer ul li{
color : #000000;
background-color : transparent;
display: inline;
}
div#footer ul li a{
color : #115EAC;
background-color : transparent;
text-decoration : none;
}
div#footer ul li a:hover{
text-decoration : underline;
}
-->
Now that I have finished creating my style sheet I want to shorten the code on page by linking it to my external style sheet. Here's how:
5. Create an external style sheet - copy and paste all the css code (without these tags: <style type="text/css"><!-- --></style>) into notepad and name it something like "style sheet". Place this style sheet between the head tags of your web page like this:
<head>
< link rel="stylesheet" href="stylesheet.css" type="text/css" />
< /head>
This will reduce the code on your page so it will load fast plus the search engines can more easily spider your web page.
6. Add content to your page - after you have got your page looking correctly, you can add more content to it. Adjustments can easily be made to any style on the page (or your whole site) by simply editing one style sheet.
7. Upload your files - be sure to upload your web pages and style sheet to the root directory of your server.

8. Validate your code - be sure to validate your xhtml code: http://validator.w3.org/ and css code: http://jigsaw.w3.org/css-validator/ and make corrections where necessary.
9. Check browser compatibility and screen resolution - check that your page renders well in the popular browsers (IE6, NN7, Firefox)
If you are beginning with CSS layouts, implement then slowly by making small changes to your pages i.e. creating a style sheet for your main headers and fonts only. As you become more familiar with CSS you may eventually build all your future sites with CSS layouts.

Absolute Relative Positioning CSS

Positioning

The CSS positioning properties allow you to position an element. It can also place an element behind another, and specify what should happen when an element's content is too big.
Elements can be positioned using the top, bottom, left, and right properties. However, these properties will not work unless the position property is set first. They also work differently depending on the positioning method.
There are four different positioning methods.

Static Positioning

HTML elements are positioned static by default. A static positioned element is always positioned according to the normal flow of the page.
Static positioned elements are not affected by the top, bottom, left, and right properties.

Fixed Positioning

An element with fixed position is positioned relative to the browser window.
It will not move even if the window is scrolled:

Example

p.pos_fixed
{
position:fixed;
top:30px;
right:5px;
}


Relative Positioning

A relative positioned element is positioned relative to its normal position.

Example

h2.pos_left
{
position:relative;
left:-20px;
}
h2.pos_right
{
position:relative;
left:20px;
}

Try it yourself »
The content of relatively positioned elements can be moved and overlap other elements, but the reserved space for the element is still preserved in the normal flow.

Example

h2.pos_top
{
position:relative;
top:-50px;
}

Relatively positioned elements are often used as container blocks for absolutely positioned elements.

Absolute Positioning

An absolute position element is positioned relative to the first parent element that has a position other than static. If no such element is found, the containing block is <html>:

Example

h2
{
position:absolute;
left:100px;
top:150px;
}


Absolutely positioned elements are removed from the normal flow. The document and other elements behave like the absolutely positioned element does not exist.
Absolutely positioned elements can overlap other elements.

Class Selector, ID Selector CSS

ID's and Classes

A lot of web designers new to the field aren't aware of the differences between ID's and classes. So here's a fairly brief article outlining proper and improper uses of the two.

ID's and What They're Used For

ID, short for fragment identifier, is a beautiful attribute, but it's very easy to use them improperly. You can only use an ID name once in any XHTML or HTML document. Duplicate ID tags will cause your page to fail validation, and can have negative effects when using JavaScript with them. Simply put, an ID is like the sticker that says "you are here" on a mall directory, and there can only ever be one of those.
Browsers use fragment identifiers as well. If you want to place a link at the top of your page that will scroll the browser down to the content when clicked, simply add id="content" to the content element or header above your content and use the following anchor:
  1. <a href="#content">Go to the content</a>
Naturally, CSS can select ID's to apply individual styles to them using the hash sign (#), but JavaScript relies on ID's quite a bit as well. The getElementById() function is very important in most scripts.

Classes

Classes, like ID's, can also be used to in JavaScript scripts, but unlike ID's, they can be used multiple times in the same HTML document. This separation of content from presentation is what makes sites powered by CSS more robust, but some don't know the full extent to which they can use classes. Classes can not only be used more than once, but more than one can be used on an element:
  1. .left {
  2.     float: left;
  3. }
  4. .larger p {
  5.     font-size: 125%;
  6. }
  1. <div class="left larger">
  2.     <p>A tiny bit of content.</p>
  3. </div>
The second piece of code is perfectly valid HTML, it demonstrates a div using two separate classes. This technique can reduce your CSS style sheet considerably when used effectively. It's also worth noting that you can use both ID's and classes on the same HTML element.

When to Use One or the Other

I take a different stance than most web designers when it comes to using ID's and classes. The vast majority of CSS coders use ID's for any elements that are simply used once on a page. However, I only use classes to style my websites, but, when I want to use an element in JavaScript, I use an identifier. From a presentational standpoint, styling elements with classes looks exactly the same as styling them with ID's, but the flexibility of classes offers a certain appeal even if I don't plan on using a class more than once on a page. Also, when I see an ID in my XHTML, it reminds me that there is some JavaScript that refers to that element.
It's up to you, but so long as you implement classes and ID's properly, it is more or less a matter of personal choice when to utilize one or the other.

Class Sector CSS

Class Selector (CSS selector)

Spec
Version
CSS1
Browser support (more…)
IE7+ FF1+ SA1.3+ OP9.2+ CH2+
Full Full Full Full Full

Syntax

.className {
declaration block
}

Description

Selecting elements on the basis of their class names is a very common technique in CSS. The attribute selector syntax [class~="warning"] is rather awkward, but thankfully there’s a simpler and shorter form for it: the class selector.
Here’s a simple example that selects all elements with a class attribute that contains the value "warning":
.warning {
  ⋮ declarations
}
This example also illustrates the use of an implied universal selector—it’s equivalent to *.warning. Note that whitespace characters can’t appear after the period, or between an element type selector, or explicit universal selector, and the period. For example, the following selector will match all p elements with a class attribute that contains the value "warning":
p.warning {
  ⋮ declarations
}
A simple selector may contain more than one attribute selector and/or class selector; in such cases, the selector pattern matches elements whose attributes contain all the specified components. Here’s an example:
div.foo.bar {
  ⋮ declarations
}
div.foo.bar[title^="Help"] {
  ⋮ declarations
}
The first example selector above matches div elements whose class attribute value contains both the words "foo" and "bar". The second example selector matches div elements whose class attribute values contains both the words "foo" and "bar", and whose title attribute values begin with the string "Help". To clarify further the html that would match the above selectors could be as follows:
<div class="foo bar">Matches first example</div>
<div class="foo bar" title="Help">Matches second example</div>

Example

The following selector will match all p elements with a class attribute that contains the value "intro":
p.intro {
  ⋮ declarations
}

Compatibility

Internet Explorer Firefox Safari Opera Chrome
5.5 6.0 7.0 8.0 1.0 1.5 2.0 3.0 3.5 1.3 2.0 3.1 4.0 9.2 9.5 10.0 2.0
Buggy Buggy Full Full Full Full Full Full Full Full Full Full Full Full Full Full Full

Types of cascading style sheets CSS

There are three types of cascading style sheets .They are as described below read carefully and enjoy
  • External style sheet, which you use when you want to apply the same styles consistently across all the pages in your Web site that are linked to it. Also known as linked style sheet.
  • Embedded style sheet, which you use when you want to define styles for the current page
  • Inline style sheet, which you apply to individual elements on a page.

Cascading Style Sheets (CSS)

Style Sheets 
A web style sheet is a form of separation of presentation and content for web design in which the markup (i.e., HTML or XHTML) of a webpage contains the page's semantic content and structure, but does not define its visual layout (style). Instead, the style is defined in an external style sheet file using a style sheet language such as CSS or XSLT. This design approach is identified as a "separation" because it largely supersedes the antecedent methodology in which a page's markup defined both style and structure.

 Cascading Style Sheets (CSS)
Cascading Style Sheets (CSS) is a style sheet language used for describing the look and formatting of a document written in a markup language. While most often used to style web pages and interfaces written in HTML and XHTML, the language can be applied to any kind of XML document, including plain XML, SVG and XUL. CSS is a cornerstone specification of the web and almost all web pages use CSS style sheets to describe their presentation.

CSS is designed primarily to enable the separation of document content from document presentation, including elements such as the layout, colors, and fonts.[1] This separation can improve content accessibility, provide more flexibility and control in the specification of presentation characteristics, enable multiple pages to share formatting, and reduce complexity and repetition in the structural content (such as by allowing for tableless web design).

CSS can also allow the same markup page to be presented in different styles for different rendering methods, such as on-screen, in print, by voice (when read out by a speech-based browser or screen reader) and on Braille-based, tactile devices. It can also be used to allow the web page to display differently depending on the screen size or device on which it is being viewed.

Solution Nepal Rastra Bank syllabus assistance Engineer

1. Basic Electronic

• Forward and reverse biasing of PN junction diode, Effects of Temperature and Junction Capacitance, LED, Zener diodes. Resisters.

• Transistors 

  1. npn- Types, Construction, Working principle as an amplifier and characteristics.
  2.  pnp - Types, Construction, Working principle as an amplifier and characteristics.

• Field Effect Transistor

  1.  JFET - Types, construction, working principles as an amplifier and characteristics.
  2. MOSFETS - Types, construction, working principles as an amplifier and characteristics.

2. Computer Architecture
• Basic computer architecture, Registers, Memory Hierarchy, Cache Memory, External Memory, Memory Management, Direct & Indirect addressing

• Organization of hard disk, RAID, Interrupt, Auxiliary Memory, Virtual Memory-Address Space, Paging

• CPU Architecture, Parallel Processing, , CISC, RISC, Control Unit

• I/O Management, I/O Interface, I/O Requests Handling, I/O Devices

3. Operating System

• Introduction to Operating System, Type of Operating System, Function of Operating System, Memory Management using Operating System, 32 bit and 64 bit Operating System
• Windows
Features and Linux Features

4. Computer Networks

• Introduction to computer network, Network architecture (LAN, MAN, WAN), Client server and peer-to-peer model, LAN architecture/standards (Token ring, Token bus).

• OSI Reference model, TCP/IP Reference model, Network Hardware and Software(NIC, Repeater, Hub, Bridge, Switch, Router, Gateway, DNS)

• Introduction to wireless LAN, Wi-Fi, TCP/IP, Subnet Mask and Subnetting, Classfull and Classless IP Addressing; Network Address Translation (NAT), Routing & Switching, Bluetooth

• Concepts on adding and removing devices in the network and domains. Sharing resources in the network.

5. Network security

• Cryptography, Digital Signature, Firewalls, Virtual Private Network (VPN), Data Encryption Standard

6. Computer Repair and Maintenance

• Concept of Hardware and Software, Power Supply, Motherboard and System Devices, BIOS, Storage Devices, Monitors (CRT, LCD, LED), Printers (Laser, Inkjet and Bubble jet), UPS

• Installation of Operating Systems (Windows, Linux etc), Management of Hard Disk (Partition and Formatting, Shrinking), Installation of Device Drivers, Configuration, Installation of Application Programs and System Restore.

• Antivirus Software Features, Virus Detection and Protection, Virus Scanning

• Connecting Computers into Network: UTP cable Standards (Straight through and Cross-Cable), Optical Fiber, Co-axial Cable, Connecting through HUB, Switch or Direct connection, Assigning IP Addresses and Testing Networking.

• Troubleshooting and Repairing Techniques: Remote Device Troubleshooting Techniques, Power Management and Protection of Devices, General Hardware/Software Failures, Performance Issues, Failure or Improper adjustment Issue.

• Backup and Disaster Recovery: Finding Risk of Data Loss, Backup Methods, Backup Devices and Media, Backup Scheduling, Recovery of Data.
7. Multimedia Technology

• Sound / Audio System, Image and Graphics, Video and Animation, Data Compression, Teleconference, Data Synchronization 

8.Web Technology

• HTML: Understanding Browsers, HTML Page Structure, Defining Web Layout, HTML Tags, Working with text/images/Tables/list/Links/ forms and its controls(Radio button, Check box, Text box, Drop-down list etc) , knowing get and post action, Use attribute Size/Max-length/Name attributes, Add/Submit/Reset Button;

• Script: Introduction to various types of script, working with variables & functions, Working with alert, confirm and prompt, Understanding loop, arrays, Creating rollover image, Working with operators; 

• Style sheet : Introduction to Cascading Style Sheets, Types of Style Sheets (Inline, Internal and External), Class Selector, ID Selector Absolute Relative Positioning, ,Inline menu, CSS Layout Design, PSD to CSS Conversion

9.Office Package

• Word Processing : Introduction(Application/usage), Document activities, Paragraph manipulation, Document/Help Wizard, Text Creation and Manipulation, Paragraph and Tab Setting, Font manipulation, Text Alignment and formatting, Use of lists and
Numbering, Header/ footer/page number, Table Manipulation, Print activities.

• Spread Sheet : Introduction(Application/usage), Cell manipulation, Tablesmanipulation, Use of formulas, Spread sheets for Simple applications.

• Presentations : Introduction(Application/usage), Making a presentation with variousslides(Wizard/Manual) containing Text, bullets, images, animation elements, SlideManipulation and Slide Show, Sorting and Printing of Slides and Handouts

10. Database

• Introduction (Application/Usage) of DBMS & RDBMS, ER concept, Basic SQL for manipulating database objects and information from database, Normalization, Backup and restore

11. Prevailing ICT related act, rules and regulation .

SQL for manipulating database objects and information from database


Some of The Most Important SQL Commands

  • SELECT - extracts data from a database
  • UPDATE - updates data in a database
  • DELETE - deletes data from a database
  • INSERT INTO - inserts new data into a database
  • CREATE DATABASE - creates a new database
  • ALTER DATABASE - modifies a database
  • CREATE TABLE - creates a new table
  • ALTER TABLE - modifies a table
  • DROP TABLE - deletes a table
  • CREATE INDEX - creates an index (search key)
  • DROP INDEX - deletes an index 

 The SQL SELECT Statement

The SELECT statement is used to select data from a database.
The result is stored in a result table, called the result-set.

SQL SELECT Syntax

SELECT column_name,column_name
FROM table_name;
and
SELECT * FROM table_name;

The SQL CREATE DATABASE Statement

The CREATE DATABASE statement is used to create a database.

SQL CREATE DATABASE Syntax

CREATE DATABASE dbname;

The SQL DELETE Statement

The DELETE statement is used to delete rows in a table.

SQL DELETE Syntax

DELETE FROM table_name
WHERE some_column=some_value;

The SQL UPDATE Statement

The UPDATE statement is used to update existing records in a table.

SQL UPDATE Syntax

UPDATE table_name
SET column1=value1,column2=value2,...
WHERE some_column=some_value;

The SQL INSERT INTO Statement

The INSERT INTO statement is used to insert new records in a table.

SQL INSERT INTO Syntax

It is possible to write the INSERT INTO statement in two forms.
The first form does not specify the column names where the data will be inserted, only their values:
INSERT INTO table_name
VALUES (value1,value2,value3,...);
The second form specifies both the column names and the values to be inserted:
INSERT INTO table_name (column1,column2,column3,...)
VALUES (value1,value2,value3,...);

The SQL CREATE TABLE Statement

The CREATE TABLE statement is used to create a table in a database.
Tables are organized into rows and columns; and each table must have a name.

SQL CREATE TABLE Syntax

CREATE TABLE table_name
(
column_name1 data_type(size),
column_name2 data_type(size),
column_name3 data_type(size),
....
);
The column_name parameters specify the names of the columns of the table.
The data_type parameter specifies what type of data the column can hold (e.g. varchar, integer, decimal, date, etc.).
The size parameter specifies the maximum length of the column of the table.

Example

CREATE TABLE Persons
(
PersonID int,
LastName varchar(255),
FirstName varchar(255),
Address varchar(255),
City varchar(255)
);

The ALTER TABLE Statement

The ALTER TABLE statement is used to add, delete, or modify columns in an existing table.

SQL ALTER TABLE Syntax

To add a column in a table, use the following syntax:
ALTER TABLE table_name
ADD column_name datatype
To delete a column in a table, use the following syntax (notice that some database systems don't allow deleting a column):
ALTER TABLE table_name
DROP COLUMN column_name
To change the data type of a column in a table, use the following syntax:

QL CREATE INDEX Syntax

Creates an index on a table. Duplicate values are allowed:
CREATE INDEX index_name
ON table_name (column_name)

SQL CREATE UNIQUE INDEX Syntax

Creates a unique index on a table. Duplicate values are not allowed:
CREATE UNIQUE INDEX index_name
ON table_name (column_name)
Note: The syntax for creating indexes varies amongst different databases. Therefore: Check the syntax for creating indexes in your database.

CREATE INDEX Example

The SQL statement below creates an index named "PIndex" on the "LastName" column in the "Persons" table:
CREATE INDEX PIndex
ON Persons (LastName)
If you want to create an index on a combination of columns, you can list the column names within the parentheses, separated by commas:
CREATE INDEX PIndex
ON Persons (LastName, FirstName)

Advantage of SQL over Access:
1) Reliability
With Access each client reads and writes directly to the raw data tables. If a client machine crashes while writing data this will usually cause the back-end database to also crash and become corrupt. The same thing will occur if the network fails, has a glitch or temporarily becomes overloaded. This problem becomes more apparent as the amount of data or the number of users increases.
With SQL Server the clients do not talk directly with the tables but with an intelligent data manager on the server. This in turn reads and writes data from and to the tables. If a client machine crashes, or the network hiccups, this will not affect the underlying tables; instead the data manager realises that the transaction has not been completed and does not commit the partially transmitted data to the database. The database therefore continues to run without problem.
The client/server system also maintains an automatic 'transaction log'. If a backup has to be restored the transaction log can be run and should restore all completed transactions up to the time of the crash.
The client/server software itself is designed for mission critical systems and is orders of magnitude more reliable than a file server system. On one system that we support the client used to experience around one to two crashes per year (admittedly their network was not exactly state of the art!) when running with an Access database. After we converted it to SQL Server two years ago the system has not experienced a single crash.
2) Data Integrity
Data integrity in SQL Server is enhanced by the use of 'triggers' which can be applied whenever a record is added, updated or deleted. This occurs at the table level and cannot thus be forgotten about, ignored or bypassed by the client machine. For example audit processes cannot be avoided (accidentally or deliberately) with this scenario.

3) Better Performance
With Access all tables involved in a form, report or a query are copied across the network from the server to the client's machine. The tables are then processed and filtered to generate the required recordset. For example if looking up details for one particular order from an orders table containing, say, 50,000 records then the whole table (all 50,000 records) is dragged over the network and then 49,999 of these records are thrown away (this is an over-simplification since indexing can be used to mitigate this to some extent). Contrast this with SQL Server where the filtering takes place on the server (if designed properly) and only 1 record is transmitted over the network.
This can affect performance in two ways. Firstly SQL Server is highly optimised and can usually perform the required filtering much more quickly than the client machine and secondly the amount of data sent across the network link is vastly reduced. For most databases the main performance bottleneck is data transmission over the network hence reducing this can give a really dramatic improvement in performance.
Predicting likely performance improvements is very difficult but an average overall speed improvement of 3 to 5 times, and possibly much more, would not be unexpected.
4) Network Traffic/Speed
As can be seen from the previous section, network traffic is greatly reduced in a client/server scenario, often by many orders of magnitude. This both improves network reliability (by reducing collisions, etc.) and also improves the performance of the network for other software (as there is less traffic on the network). Where there is a slow connection, such as over a telephone dial-up, Access is usually so slow as to be all but unusable (obviously this does depend upon the amount of data) whereas a SQL Server application, if designed for this environment, can still be perfectly useable.

5) Low Bandwidth
This occurs when you are accessing your database over a connection that only supports low data speeds, which, for all practical situations, means anything other than a LAN. In all low bandwidth situations Access/JET usually performs so slowly as to be unusable whilst a correctly designed SQL Server system can be similar in speed to running it over a LAN.

6) Scalability
A file-server system such as Access is designed for small workgroups and is scalable to perhaps 10 concurrent clients. Above this level performance starts to degrade rapidly as more users are added. With the SQL Server client/server architecture many hundreds, or even thousands (with the appropriate infrastructure), of concurrent users can be supported without significant performance degradation.

Advantages of SQL:* High Speed: SQL Queries can be used to retrieve large amounts of records from a database quickly and efficiently.
* Well Defined Standards Exist:
SQL databases use long-established standard, which is being adopted by ANSI & ISO. Non-SQL databases do not adhere to any clear standard.
* No Coding Required:
Using standard SQL it is easier to manage database  systems without having to write substantial amount
of code.
* Emergence of ORDBMS:
Previously SQL databases were synonymous with  relational database. With the emergence of Object
Oriented DBMS, object storage capabilities are extended to relational databases.

Disadvantages of SQL:

* Difficulty in Interfacing:
Interfacing an SQL database is more complex than adding a few lines of code.
* More Features Implemented in Proprietary way:
Although SQL databases conform to ANSI & ISO  standards, some databases go for proprietary extensions to standard SQL to ensure vendor lock-in.

Backup and Restore Databse

A secure Backup mechanism is needed for every database system. The data must be assessed when the database server is not functioning or the .other secure data base must be maintained  server is crashed.
 the condision of the data base must be according to the tye of organisatin system that is using.some otrganisation must have the access of it  every time ,and some dont have such emergency mechanism to be implemented.

the database may be stored in the hard drive or othe r different memory so that it camn be easy restord when needed.

Database Normalization

1) In relational database design, the process of organizing data to minimize redundancy. Normalization usually involves dividing a database into two or more tables and defining relationships between the tables. The objective is to isolate data so that additions, deletions, and modifications of a fieldcan be made in just one table and then propagated through the rest of the database via the defined relationships.
There are three main normal forms, each with increasing levels of normalization:
  • First Normal Form (1NF):Each field in a table contains different information. For example, in an employee list, each table would contain only one birthdate field.
  • Second Normal Form (2NF):Each field in a table that is not a determiner of the contents of another field must itself be a function of the other fields in the table.
  • Third Normal Form (3NF): No duplicate information is permitted. So, for example, if two tables both require a birthdate field, the birthdate information would be separated into a separate table, and the two other tables would then access the birthdate information via an index field in the birthdate table. Any change to a birthdate would automatically be reflect in all tables that link to the birthdate table.
  • There are additional normalization levels, such as Boyce Codd Normal Form (BCNF), fourth normal form (4NF) and fifth normal form (5NF). While normalization makes databases more efficient to maintain, they can also make them more complex because data is separated into so many different tables.
    9 Reasons to Partner With Information Builders: Providing Critical Capabilities for Data-Driven 
     
    (2) In data processing, a process applied to all data in a set that produces a specific statistical property. For example, each expenditure for a month can be divided by the total of all expenditures to produce a percentage.

    (3) In programming, changing the format of a floating-point numberso the left-most digit in the mantissa is not a zero.


    Relational Database Management System (RDBMS) usages and application

    A relational Database Management System is the most widely used type of DBMS . It stores database in multipal tables. The multiple tables can be linked with each other on the basic of key field. It allows the User to use more than one table simultaneous at a time . A user can view or retrive records from the linked multiple tables at a time. MS-Access,Oracle,and SQL Servers are RDBMS Software. A relational database management system (RDBMS) is a specific type of database that contain tables of data. These types of databases are often used in supporting either a single or several affiliated software applications. Specific database programming language is used to modify and report on the data. Several techniques can speed data retrieval and reduce duplication.

    Organizations may use RDBMS for storing inventory, employee, customer, and other data. Users can interact with the system through software applications that include programming code to work with the database. These software applications can be traditional or web-based.

    A relational database management system consists of tables with columns and rows. The column label identifies the data in the rows within the column. Each row contains the actual data for an instance of an entity, which can be a person, location, object, or idea. A customer database, for example, may have columns for the customer's ID, first name, last name, and email address, and each row contains an individual customer’s data.

    These systems are accessed and updated using structured query language (SQL). To work with the data, a database developer will write programming statements called queries. Different brands of database management systems may require the use of different versions of SQL, though they have many similarities.
    Ad

    An RDBMS may use several types of tables. Base tables hold the entire set of data. Temporary tables store data that is being manipulated as a query is running. Results tables store the query outcomes.

    Relational database management systems use several types of keys for retrieving data. A primary key identifies one particular instance of an entity. For an employee table, the primary key may be an employee identification number that each employee is permanently assigned to and which no other employee will use. Unique keys are other data elements that are also exclusive to each instance of an entity. For example, a retailer may assign inventory items with unique supplier item numbers.

    A third type of key is a foreign key. In the relational model, it establishes relationships between entities. Using foreign keys, a relationship between a company’s customers and each customer's sales can be maintained without duplicating data in the relational database management system.
    The speed of data retrieval is important, especially as the amount of data increases. A developer may add an index to an RDBMS to allow queries to run faster. The index typically uses a primary key, such as a tax identification number.

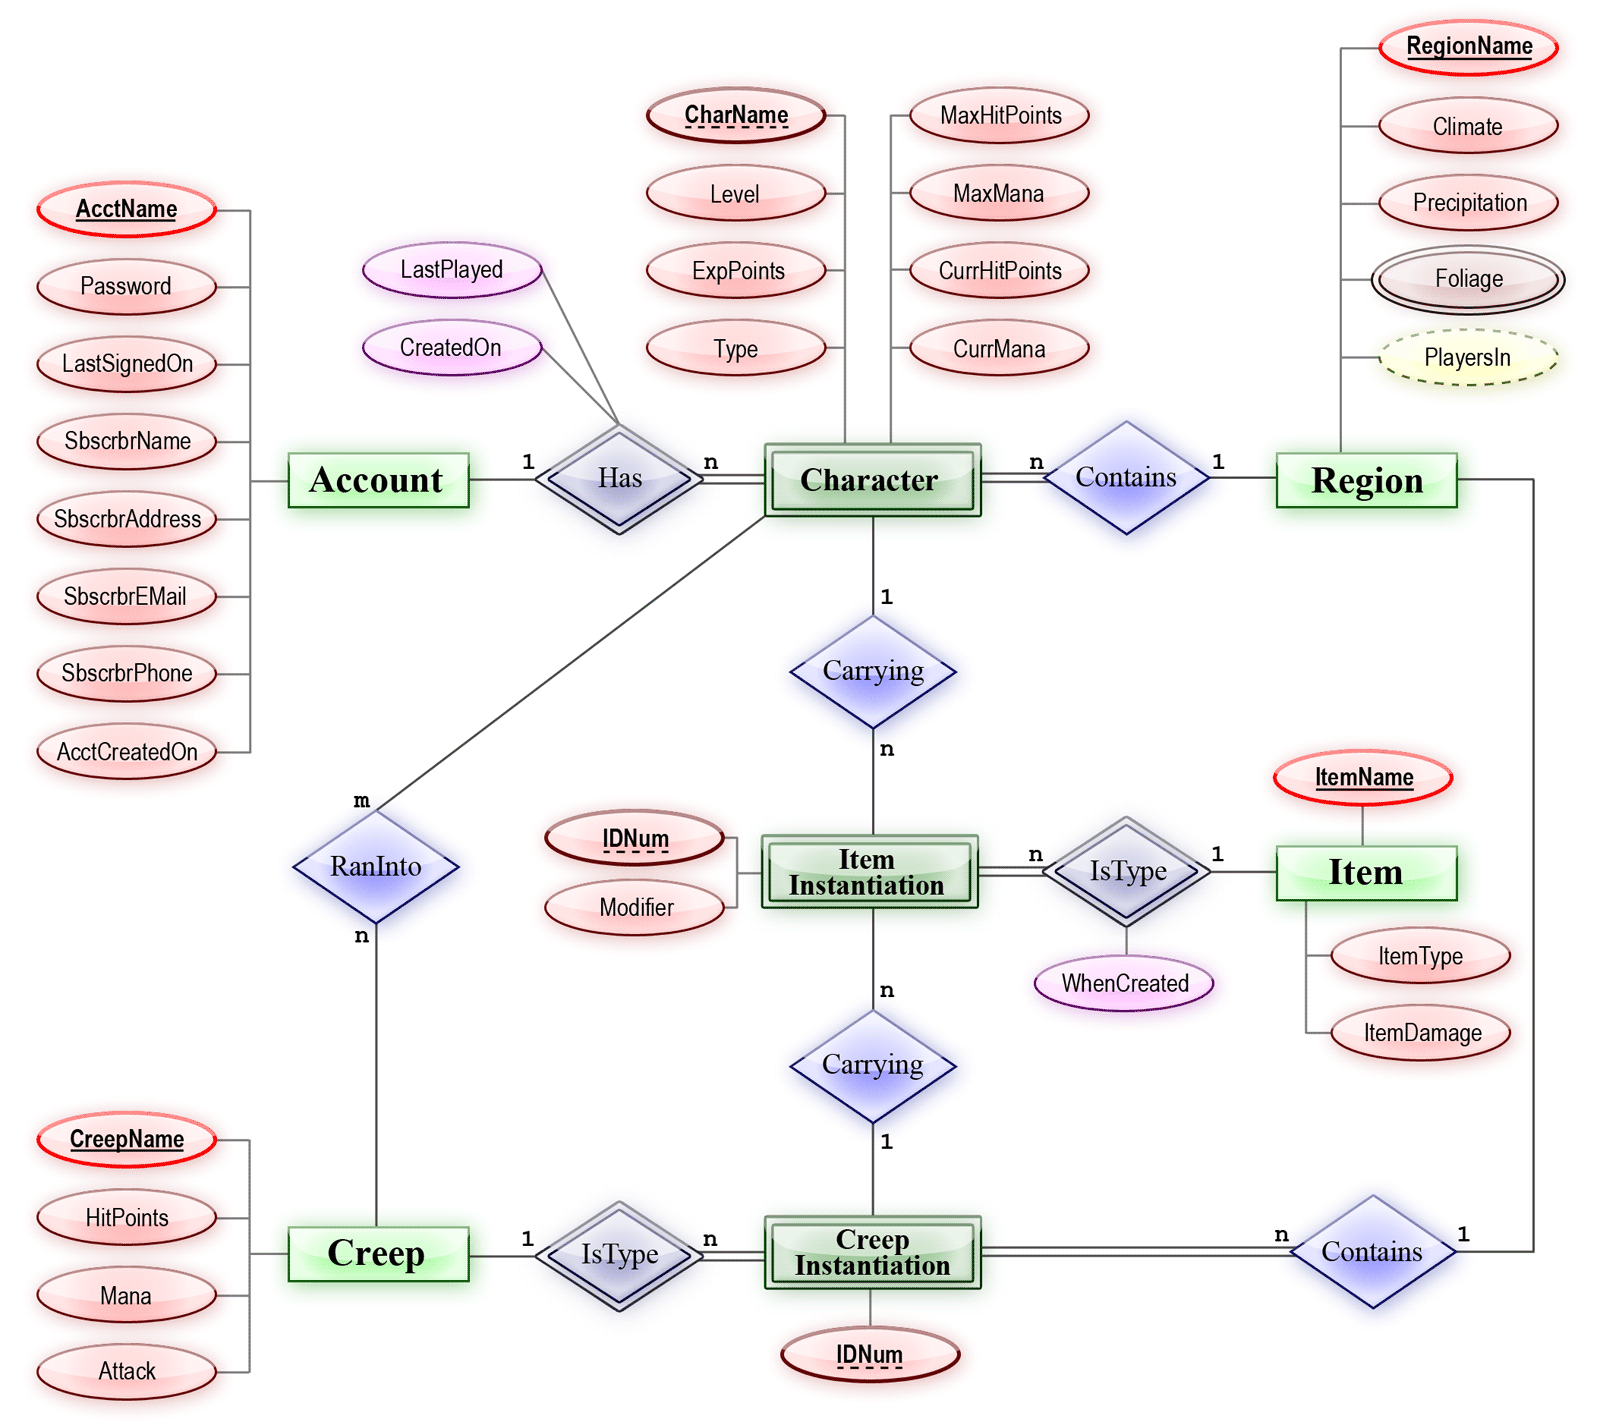
    entity–relationship model (ER model)

    In software engineering, an entity–relationship model (ER model) is a data model for describing the data or information aspects of a business domain or its process requirements, in an abstract way that lends itself to ultimately being implemented in a database such as a relational database. The main components of ER models are entities (things) and the relationships that can exist among them.

    Entity-relationship modeling was developed by Peter Chen and published in a 1976 paper.However, variants of the idea existed previously, and have been devised subsequently such as supertype and subtype data entities and commonality relationships.


    http://upload.wikimedia.org/wikipedia/commons/7/72/ER_Diagram_MMORPG.png

    An entity may be defined as a thing which is recognized as being capable of an independent existence and which can be uniquely identified. An entity is an abstraction from the complexities of a domain. When we speak of an entity, we normally speak of some aspect of the real world which can be distinguished from other aspects of the real world.
    An entity may be a physical object such as a house or a car, an event such as a house sale or a car service, or a concept such as a customer transaction or order. Although the term entity is the one most commonly used, following Chen we should really distinguish between an entity and an entity-type. An entity-type is a category. An entity, strictly speaking, is an instance of a given entity-type. There are usually many instances of an entity-type. Because the term entity-type is somewhat cumbersome, most people tend to use the term entity as a synonym for this term.

    Entities can be thought of as nouns. Examples: a computer, an employee, a song, a mathematical theorem.

    A relationship captures how entities are related to one another. Relationships can be thought of as verbs, linking two or more nouns. Examples: an owns relationship between a company and a computer, a supervises relationship between an employee and a department, a performs relationship between an artist and a song, a proved relationship between a mathematician and a theorem.

    The model's linguistic aspect described above is utilized in the declarative database query language ERROL, which mimics natural language constructs. ERROL's semantics and implementation are based on reshaped relational algebra (RRA), a relational algebra which is adapted to the entity–relationship model and captures its linguistic aspect.

    Entities and relationships can both have attributes. Examples: an employee entity might have a Social Security Number (SSN) attribute; the proved relationship may have a date attribute.

    Every entity (unless it is a weak entity) must have a minimal set of uniquely identifying attributes, which is called the entity's primary key.

    Entity–relationship diagrams don't show single entities or single instances of relations. Rather, they show entity sets and relationship sets. Example: a particular song is an entity. The collection of all songs in a database is an entity set. The eaten relationship between a child and her lunch is a single relationship. The set of all such child-lunch relationships in a database is a relationship set. In other words, a relationship set corresponds to a relation in mathematics, while a relationship corresponds to a member of the relation.

    Certain cardinality constraints on relationship sets may be indicated as well.
    Two related entities
    An entity with an attribute
    A relationship with an attribute

    Application And Usages of dataBase management system DBMS

    A database management system (DBMS) is a collection of programs that enables you to store, modify, and extract information from a database. There are many different types of DBMSs, ranging from small systems that run on personal computers to huge systems that run on mainframes.

    Application  Database System

    Database systems are widely used in different areas because of their numerous advantages. Some of the most common database applications are listed here.
    • Airlines and railways: Airlines and railways use online databases for reservation, and for displaying the schedule information.
    • Banking: Banks use databases for customer inquiry, accounts, loans, and other transactions.
    • Education: Schools and colleges use databases for course registration, result, and other information.
    • Telecommunications: Telecommunication departments use databases to store information about the communication network, telephone numbers, record of calls, for generating monthly bills, etc.
    • Credit card transactions: Databases are used for keeping track of purchases on credit cards in order to generate monthly statements.
    • E-commerce: Integration of heterogeneous information sources (for example, catalogs) for business activity such as online shopping, booking of holiday package, consulting a doctor, etc.
    • Health care information systems and electronic patient record: Databases are used for maintaining the patient health care details.
    • Digital libraries and digital publishing: Databases are used for management and delivery of large bodies of textual and multimedia data.
    • Finance: Databases are used for storing information such as sales, purchases of stocks and bonds or data useful for online trading.
    • Sales: Databases are used to store product, customer and transaction details.
    • Human resources: Organizations use databases for storing information about their employees, salaries, benefits, taxes, and for generating salary checks.

      The basic tasks solved by DBMS application/Usages:
      • Effective processing complex data and data with set of the references for expression of the relations between them.
      • Building of Internet-shops and distributed information systems.
      • Building of the virtual company office and virtual kiosks.
      • Storage and reproduction of graphic images, video and audio.
      • Creation of WEB-sites, allotted to unlimited opportunities.
         

    multimedia nat good note

    Definition of Multimedia:
    Computer-based techniques of text, images, audio, video, graphics, animation,  and any other medium where every type of information can be represented,  processed, stored, transmitted, produced and presented digitally.

    A Classification of Multimedia
    • Text - ASCII/Unicode, HTML, Postscript, PDF
    • Audio – Sound, music, speech, structured audio (e.g. MIDI)
    • Still Image - Facsimile, photo, scanned image
    • Video (Moving Images) – Movie, a sequence of pictures
    • Graphics – Computer produced image
    • Animation – A sequence of graphics images

    • Discrete Media (DM, Static): text, image, graphics
    • Continuous Media (CM, Dynamic): audio, video, animation
    • Captured vs Synthesized media
    • Standalone vs Networked media

    Why is Multimedia Important ?
    • Digital audio/video is revolutionizing music, film, game, and video audio industries
    • Convergence of computers, telecommunication, radio, and TV
    – Caused by technology and competition
    – Dramatic changes in products and infrastructure
    • New application potential
    – Huge potential markets
    – Improving our lives (learning, entertainment, and work)
    • Interesting technical issues


    Add ,Submit,Reset Button HTML

    Add button 

    The <button> tag defines a clickable button.
    Inside a <button> element you can put content, like text or images. This is the difference between this element and buttons created with the <input> element.

    Submit Button

    <input type="submit"> defines a submit button.
    A submit button is used to send form data to a server. The data is sent to the page specified in the form's action attribute. The file defined in the action attribute usually does something with the received input:
    <form name="input" action="demo_form_action.asp" method="get">
    Username: <input type="text" name="user">
    <input type="submit" value="Submit">
    </form>
    How the HTML code above looks in a browser:
    Username:
    If you type some characters in the text field above, and click the "Submit" button, the browser will send your input to a page called "demo_form_action.asp". The page will show you the received input.

    Example 
    type="submit"
    Creates a submit button on the form.
    When this button is clicked, the form data is submitted to the server.
    type="reset"
    Creates a reset button on the form.
    When this button is clicked, the input is reset.
    name=""
    The button name is used to identify the clicked submit button.
    value=""
    Value is the text displayed on the button.

    Example

    <form method="POST" action="example.cgi">
    
    <p><input type="text" name="name" size="30"></p>
    
    <p>
    <input type="submit" value="Submit Button">
    <input type="reset" value="Reset Button">
    </p>
    
    </form>
    
    Output


          submit                     reset


    Use attribute Size ,Max-length ,Name attributes

     
    Common input element attributes
    The maxlength and minlength attributes
    The maxlength attribute is a form control maxlength attribute.
    The minlength attribute is a form control minlength attribute.
    If the input element has a maximum allowed value length, then the code-unit length of the value of the element's value attribute must be equal to or less than the element's maximum allowed value length.
    The following extract shows how a messaging client's text entry could be arbitrarily restricted to a fixed number of characters, thus forcing any conversation through this medium to be terse and discouraging intelligent discourse.
    <label>What are you doing? <input name=status maxlength=140></label>
    Here, a password is given a minimum length:
    <p><label>Username: <input name=u required></label>
    <p><label>Password: <input name=p required minlength=12></label>
    The size attribute
    The size attribute gives the number of characters that, in a visual rendering, the user agent is to allow the user to see while editing the element's value.
    The size attribute, if specified, must have a value that is a valid non-negative integer greater than zero.
    e=file multiple name=att></label>

    The min and max attributes
    Some form controls can have explicit constraints applied limiting the allowed range of values that the user can provide. Normally, such a range would be linear and continuous. A form control can have a periodic domain, however, in which case the form control's broadest possible range is finite, and authors can specify explicit ranges within it that span the boundaries.
    Specifically, the broadest range of a type=time control is midnight to midnight (24 hours), and authors can set both continuous linear ranges (such as 9pm to 11pm) and discontinuous ranges spanning midnight (such as 11pm to 1am).
    The min and max attributes indicate the allowed range of values for the element.
    If the element does not have a periodic domain, the max attribute's value (the maximum) must not be less than the min attribute's value (its minimum).
    An element has range limitations if it has a defined minimum or a defined maximum.
    The following date control limits input to dates that are before the 1980s:
    <input name=bday type=date max="1979-12-31">
    The following number control limits input to whole numbers greater than zero:
    <input name=quantity required="" type="number" min="1" value="1">
    The following time control limits input to those minutes that occur between 9pm and 6am, defaulting to midnight:
    <input name="sleepStart" type=time min="21:00" max="06:00" step="60" value="00:00">


    Name attribute

    Definition and Usage

    The <a> name attribute is not supported in HTML5. Use the id attribute instead.
    The name attribute specifies the name of an anchor.
    The name attribute is used to create a bookmark inside a document.
    The href or the name attribute must be present in the <a> tag.


    The name attribute specifies the name of an anchor:
    <a name="C4">Chapter 4</a>