An Introduction to Keil MicroVision
Embedded system
means some combination of computer hardware and programmable software
which is specially designed for a particular task like displaying
message on LCD. If you are still wondering about an embedded system,
just take a look at these circuit applications using 8051
microcontroller. You can call these applications embedded systems as it
involves hardware (8051 microcontroller) and software (the code written
in assembly language).
Some real life examples of embedded
systems may involve ticketing machines, vending machines, temperature
controlling unit in air conditioners etc. Microcontrollers are nothing
without a Program in it.
One of the important part in making an
embedded system is loading the software/program we develop into the
microcontroller. Usually it is called “burning software”
into the controller. Before “burning a program” into a controller, we
must do certain prerequisite operations with the program. This includes
writing the program in assembly language or C language in a text editor
like notepad, compiling the program in a compiler and finally generating
the hex code from the compiled program. Earlier people used different
softwares/applications for all these 3 tasks. Writing was done in a text
editor like notepad/wordpad, compiling was done using a separate
software (probably a dedicated compiler for a particular controller like
8051), converting the assembly code to hex code was done using another
software etc. It takes lot of time and work to do all these separately,
especially when the task involves lots of error debugging and reworking
on the source code.
Keil MicroVision is a
free software which solves many of the pain points for an embedded
program developer. This software is an integrated development
environment (IDE), which integrated a text editor to write programs, a
compiler and it will convert your source code to hex files too.
Here is simple guide to start working with Keil uVision which can be used for
- Writing programs in C/C++ or Assembly language
- Compiling and Assembling Programs
- Debugging program
- Creating Hex and Axf file
- Testing your program without Available real Hardware (Simulator Mode)
This is simple guide on Keil uVision 4 though also applicable on previous versions also.
These are the simple steps to get off the mark your inning!
Step 1: After opening Keil uV4, Go to Project tab and
Create new uVision project
Now Select new folder and give name to Project.
Step 2: After Creating project now Select your device model. Example.NXP-LPC2148
[You can change it later from project window.]
Step 3: so now your project is created and Message window will appear to add startup file of your Device click on Yes so it will be added to your project folder
Step 4: Now go to File and create new file and save it with .C extension if you will write program in C language or save with .asm for assembly language.
i.e., Led.c
Step 5: Now write your program and save it again. You can try example given at end of this tutorial.
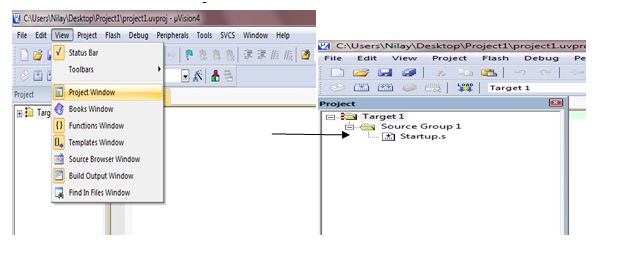
Step 6: After that on left you see project window [if it’s not there….go to View tab and click on project window]
Now come on Project window.
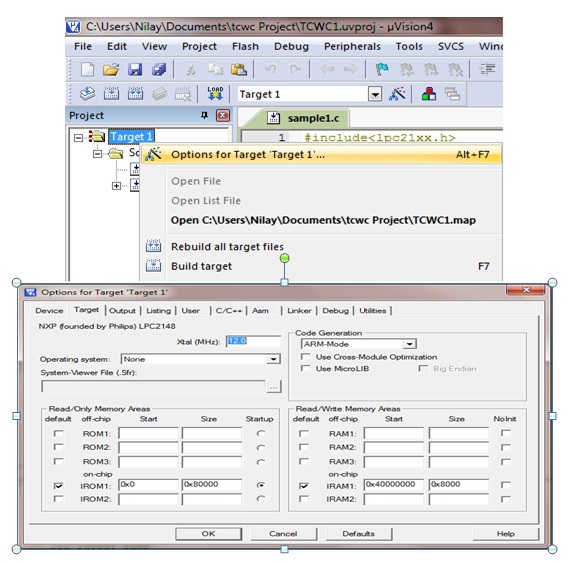
Right click on target and click on options for target
Here you can change your device also.
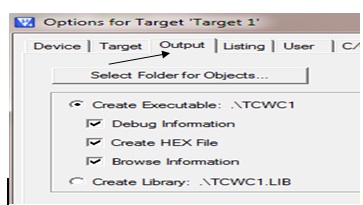
Click output tab here & check create Hex file if you want to generate hex file
Now click on ok so it will save changes.
Step 7: Now Expand target and you will see source group
Right click on group and click on Add files to source group
Now add your program file which you have written in C/assembly.
You can see program file added under source group.
Step 8: Now Click on Build target.You can find it under Project tab or in toolbar.It can also be done by pressing F7 key.
Step 9: you can see Status of your program in Build output window
[If it’s not there go to view and click on Build output window]
Now you are done with your program. Next time we will look at Debugging and Simulation of Program. Hope you find it helpful.


No comments:
Post a Comment
its cool